

If you’re a fan of rich, savory flavors and crispy, golden chicken, then Chicken Romano That Will Blow Your Mind is about to become your new go-to recipe! Imagine tender chicken breast coated in a perfect blend of Romano and Parmesan cheese, seasoned with aromatic Italian herbs and fried to crispy perfection. The creamy sauce elevates each bite, adding a touch of luxury to this simple yet incredibly flavorful dish. Whether you’re cooking for a busy weeknight or impressing guests at your next dinner party, this recipe is as versatile as it is delicious. Ready to transform your chicken dinner into something truly unforgettable? Let’s dive in!
Table of Contents
Key Benefits of Chicken Romano
If you’re looking for a recipe that combines crispy chicken, rich flavors, and a creamy sauce, then Chicken Romano is exactly what you need. Whether you’re cooking for a busy weeknight or preparing for a special occasion, this dish checks all the boxes. Let’s take a look at some of the key benefits that make this recipe a true winner!
1. Easy to Make
Despite its impressive taste, Chicken Romano is surprisingly simple to prepare. With just a handful of ingredients—chicken breast, Romano cheese, and a few pantry staples—you’ll have a gourmet meal ready in no time. Perfect for busy weeknights when you want something delicious but don’t have hours to spend in the kitchen.
2. Full of Flavor
This dish is packed with savory goodness. The crispy, breaded chicken provides the perfect contrast to the creamy, cheesy sauce made with Romano and Parmesan cheeses. Add in the Italian herbs, a splash of lemon for brightness, and you have a dish that’s bursting with flavor in every bite. It’s the kind of meal that will have everyone at the table saying, “Wow, this is amazing!”
3. Family-Friendly
Chicken Romano is a crowd-pleaser, making it ideal for family dinners. The crispy, golden chicken is a hit with both adults and kids, and the creamy sauce makes it feel extra special. You can easily adjust the portion sizes to serve a family or even prepare a large batch for leftovers!
4. Versatile
This dish pairs wonderfully with a variety of sides, making it perfect for different occasions. Serve it with pasta, a fresh salad, or roasted vegetables—the possibilities are endless! You can even swap out chicken breast for chicken thighs or add in some spinach for a twist. It’s a recipe that allows for plenty of customization based on your tastes.
5. Perfect for Meal Prep
Looking for a dish that can be prepped ahead of time? Chicken Romano holds up well in the fridge, so you can make it in advance and have a ready-to-serve meal for the next few days. Simply reheat and enjoy!
6. Budget-Friendly
Unlike some other gourmet recipes, Chicken Romano won’t break the bank. The ingredients are simple and affordable, making it a great choice for anyone looking to eat well without spending too much.
With all these benefits, it’s no wonder Chicken Romano is a favorite among home cooks! It’s easy, flavorful, and versatile enough to suit any occasion. Ready to give it a try?
Ingredients for Chicken Romano
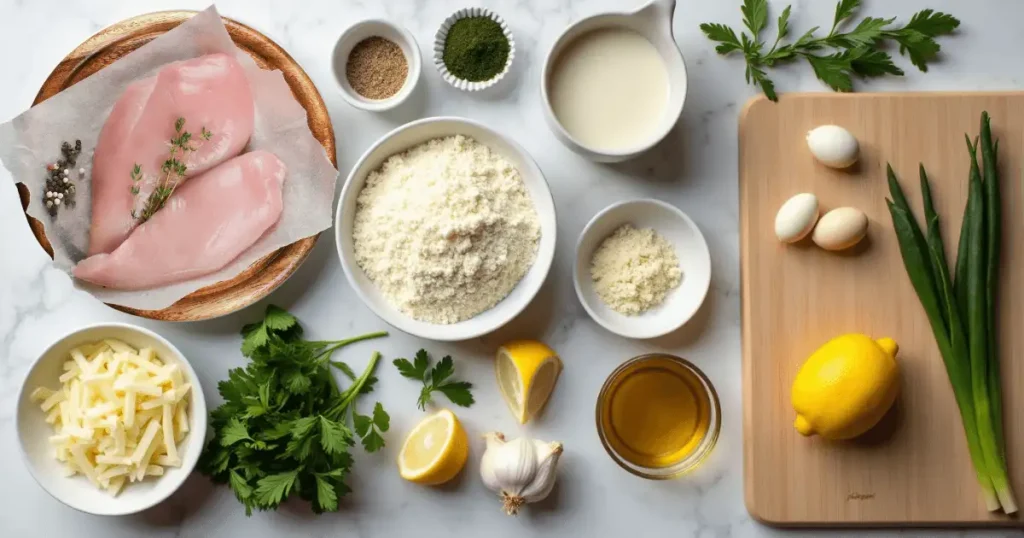
Before we dive into the cooking process, let’s gather all the ingredients you’ll need to create this mouthwatering Chicken Romano. Don’t worry—most of these ingredients are simple pantry staples, and a few high-quality additions will make all the difference in flavor. Here’s what you’ll need:
For the Chicken:
- Boneless, skinless chicken breasts (4 pieces)
- Chicken breast is the best choice for this dish, as it cooks quickly and evenly, giving you a juicy, tender result. If you prefer a juicier cut, feel free to use chicken thighs instead!
- Chicken breast is the best choice for this dish, as it cooks quickly and evenly, giving you a juicy, tender result. If you prefer a juicier cut, feel free to use chicken thighs instead!
- Salt and pepper (to taste)
- Always season your chicken well to ensure it’s full of flavor right from the start.
- Always season your chicken well to ensure it’s full of flavor right from the start.
- Italian seasoning (1 tbsp)
- A blend of oregano, basil, and thyme will give the chicken that perfect Mediterranean touch.
- A blend of oregano, basil, and thyme will give the chicken that perfect Mediterranean touch.
For the Crispy Coating:
- Romano cheese, grated (1/2 cup)
- This sharp, nutty cheese adds a depth of flavor to the crispy crust that will make each bite irresistible.
- This sharp, nutty cheese adds a depth of flavor to the crispy crust that will make each bite irresistible.
- Parmesan cheese, grated (1/2 cup)
- A classic Italian cheese, Parmesan adds a salty, savory note to the coating.
- A classic Italian cheese, Parmesan adds a salty, savory note to the coating.
- Panko bread crumbs (1 cup)
- Panko bread crumbs are perfect for achieving that crunchy, golden exterior. If you can’t find panko, regular bread crumbs will work too, but panko will give you the best texture.
- Panko bread crumbs are perfect for achieving that crunchy, golden exterior. If you can’t find panko, regular bread crumbs will work too, but panko will give you the best texture.
- Garlic powder (1 tsp)
- Garlic powder gives the chicken an extra layer of flavor in the crust. You could also use fresh minced garlic if you prefer.
- Garlic powder gives the chicken an extra layer of flavor in the crust. You could also use fresh minced garlic if you prefer.
For the Creamy Romano Sauce:
- Olive oil (2 tbsp)
- Olive oil is ideal for sautéing the garlic and creating a rich base for the sauce.
- Olive oil is ideal for sautéing the garlic and creating a rich base for the sauce.
- Minced garlic (3 cloves)
- Fresh garlic adds a bold, aromatic kick to the sauce.
- Fresh garlic adds a bold, aromatic kick to the sauce.
- Heavy cream (1 cup)
- For a rich, velvety sauce, heavy cream is the way to go. If you prefer a lighter version, you can substitute half-and-half or whole milk.
- For a rich, velvety sauce, heavy cream is the way to go. If you prefer a lighter version, you can substitute half-and-half or whole milk.
- Romano cheese, grated (1/2 cup)
- We’re doubling down on the Romano cheese in the sauce to ensure it’s wonderfully creamy and cheesy.
- We’re doubling down on the Romano cheese in the sauce to ensure it’s wonderfully creamy and cheesy.
- Lemon juice (1 tbsp)
- A squeeze of fresh lemon juice adds brightness and balances the richness of the sauce.
- A squeeze of fresh lemon juice adds brightness and balances the richness of the sauce.
- Fresh parsley (for garnish)
- Fresh parsley not only adds a pop of color but also a refreshing herbaceous note that ties everything together.
- Fresh parsley not only adds a pop of color but also a refreshing herbaceous note that ties everything together.
Optional Garnishes and Sides:
- Lemon wedges for serving
- Serve with a slice of lemon for an extra burst of citrus.
- Serve with a slice of lemon for an extra burst of citrus.
- Pasta, garlic bread, or roasted vegetables
- These sides make the perfect accompaniment to this creamy, crispy dish.
- These sides make the perfect accompaniment to this creamy, crispy dish.
Now that you have all your ingredients ready, you’re set to create a flavorful, crispy masterpiece. The combination of Romano cheese, Parmesan, and the crispy coating will give your chicken an irresistible texture, while the creamy sauce will take each bite to the next level. Let’s move on to cooking!
Chicken takes center stage in this recipe, but if you prefer chicken, feel free to experimental. Use other recipes of chicken.
How to Make Chicken Romano

Now that you have all your ingredients ready, let’s begin cooking! Chicken Romano is easier than you might think, and the result is absolutely delicious—crispy chicken paired with a rich, creamy sauce. Follow these easy steps to make a dish that is sure to impress!
Step 1: Prepare the Chicken
Start by preparing your chicken breasts. If they’re thick, you can slice them in half horizontally to create thinner, more even pieces. This ensures the chicken cooks through without drying out and helps create a crispy crust.
- Tip: For extra juiciness, consider lightly pounding the chicken breasts to an even thickness. This helps them cook faster and ensures they stay tender.
Season both sides of the chicken with a pinch of salt, pepper, and Italian seasoning. The seasoning will enhance the chicken’s natural flavors and provide a savory base for the breading.
Step 2: Make the Crispy Coating
In a shallow bowl, combine Romano cheese, Parmesan cheese, panko bread crumbs, and garlic powder. This mixture creates the deliciously crispy coating for your chicken.
- Tip: For the crispiest coating, make sure to press the breading onto the chicken as you coat it. This helps it stick better and gives you that perfect crunch.
Dip each piece of chicken into the breadcrumb mixture, making sure it’s evenly coated on both sides. This is where the cheese really shines, creating a golden, crispy exterior with a rich, cheesy flavor.
Step 3: Fry the Chicken
Warm a lot of olive oil in a big skillet on medium-high heat. The oil should cover the bottom of the pan but not completely submerge the chicken. You want enough oil to get a crisp texture without deep frying.
- Tip: Don’t overcrowd the pan! Fry the chicken in batches if necessary. Overcrowding can lower the temperature of the oil, which results in soggy breading.
Carefully add the coated chicken to the hot pan and cook for about 4-5 minutes per side, until the chicken is golden brown and crispy. The internal temperature should be 165°F (74°C) when cooked thoroughly.
- Pro Tip: If you’re unsure whether the chicken is done, use a meat thermometer. It’s the most accurate way to ensure the chicken is cooked through while staying juicy inside.
Step 4: Make the Creamy Romano Sauce
When the chicken is done, take it out of the skillet and place it on a plate. In the same skillet, reduce the heat to medium and add a bit more olive oil or butter.
- Add minced garlic and sauté it for 30 seconds, just until it becomes fragrant—be careful not to burn it!
Finally, add the heavy cream and blend with the garlic. Allow the cream to simmer for about 2-3 minutes to thicken slightly. As it thickens, add in the Romano cheese and stir until it melts into a creamy, cheesy sauce.
- Tip: Stir constantly to prevent the sauce from curdling, and adjust the heat as needed. You want the sauce to be smooth and creamy, not too thick or too runny.
Finally, squeeze in a bit of lemon juice to brighten the sauce and balance out the richness. Taste the sauce and adjust seasoning with salt, pepper, or more Italian seasoning, if needed.
Step 5: Combine the Chicken with the Sauce
Return the crispy chicken to the skillet, spooning some of the creamy sauce over the top. Allow the chicken to simmer in the sauce for 2-3 minutes for the flavors to combine.
- Tip: This step is key for making sure the chicken absorbs some of the delicious sauce while keeping its crispy exterior. Don’t let it sit too long in the sauce to avoid losing that crispy texture!
Step 6: Garnish and Serve
Sprinkle the finished dish with fresh parsley for a pop of color and flavor. Serve your Chicken Romano with your favorite sides like pasta, garlic bread, or roasted vegetables.
- Pro Tip: For a complete meal, try serving this with a simple green salad or some roasted potatoes. The creamy sauce pairs perfectly with any side!
Now you have a perfectly crispy, creamy, and flavorful Chicken Romano that’s sure to wow your family or guests. With just a few simple steps, you can create a dish that tastes like it’s from a restaurant—but with the comfort of homemade goodness. Ready to dig in? Enjoy!
Pro Tips and Variations for Chicken Romano
If you want to take your Chicken Romano to the next level or personalize it to suit your tastes, check out these pro tips and delicious variations that will elevate the dish and make it uniquely yours. Whether you want to tweak the flavor, texture, or presentation, these tips will help you achieve the best results every time.
1. Make It Even Crispier
For an extra crispy coating, try dipping your chicken in egg wash (a beaten egg mixed with a splash of water or milk) before coating it in the breadcrumb mixture. This extra layer of egg helps the breadcrumbs adhere better, giving you an even crunchier texture.
- Pro Tip: If you prefer a lighter crust, skip the egg wash and use just the breadcrumbs and cheese. This will give you a thinner, lighter crunch.
2. Add Some Heat
If you love a little spice, consider adding a pinch of red pepper flakes to the breadcrumb mixture or the creamy Romano sauce. This will give your dish a subtle kick that pairs wonderfully with the richness of the sauce and the savory flavors of the chicken.
- Pro Tip: For even more heat, drizzle a bit of sriracha sauce on top of the chicken right before serving. It’s a quick way to add some excitement to the dish!
3. Use Different Cheeses
While Romano cheese is the star of this recipe, feel free to experiment with other cheeses for the coating and sauce. Parmesan, Asiago, or Pecorino Romano will all work beautifully and bring their unique flavors to the table.
- Pro Tip: If you want an ultra-creamy sauce, you can add a bit of cream cheese to the sauce base. It’ll make the sauce even richer and smoother.
4. Make It Lighter
Looking for a lighter version of this dish? You can easily reduce the calories without sacrificing flavor by baking the chicken instead of frying it. Simply bake the breaded chicken breasts at 375°F (190°C) for about 20-25 minutes, flipping halfway through, until golden brown and crispy.
- Pro Tip: Instead of heavy cream, you can substitute half-and-half or whole milk in the sauce to cut down on the richness while still keeping it creamy.
5. Add Vegetables
For a healthier twist, serve your Chicken Romano with roasted or sautéed vegetables like broccoli, zucchini, or spinach. The fresh flavors of these veggies balance out the richness of the dish, making it a more complete meal.
- Pro Tip: Add some sautéed mushrooms to the sauce for an earthy flavor that complements the creamy Romano sauce beautifully.
6. Serve with Different Sides
Chicken Romano pairs well with a variety of sides. If you’re looking for a traditional Italian-style meal, serve it with spaghetti, fettuccine, or a side of garlic bread for a true Italian experience. For a lighter option, try zucchini noodles or a fresh green salad.
- Pro Tip: For a crunchy texture contrast, serve the chicken with crispy roasted potatoes or fried polenta rounds.
7. Make It a Full Meal
To create a complete meal out of your Chicken Romano, add a side of soup like tomato basil soup or minestrone. The creamy, comforting nature of the soup pairs wonderfully with the crispy chicken and adds a cozy vibe to the meal.
- Pro Tip: If you’re cooking for a crowd, consider serving Chicken Romano alongside a big platter of antipasto salad—it’s an easy and colorful way to round out the meal.
With these pro tips and variations, you can easily customize your Chicken Romano to match your taste preferences or make it perfect for any occasion. Whether you go for extra cheese, spice it up with a little heat, or lighten it up with baked chicken and veggies, this dish can be as versatile as you want it to be. Keep these suggestions in mind, and soon you’ll have a signature recipe that’s uniquely yours!
Serving Suggestions for Chicken Romano

Now that you’ve created the perfect Chicken Romano, let’s talk about how to serve it up for an unforgettable meal! This dish is versatile and pairs well with a wide variety of sides, enhancing the flavors and textures. Whether you’re hosting a dinner party or enjoying a cozy meal with family, these serving suggestions will help you create a balanced, mouthwatering spread.
1. Serve Over Pasta
One of the most classic ways to enjoy Chicken Romano is by pairing it with a comforting pasta dish. Spaghetti, fettuccine, or linguine all complement the crispy chicken and creamy Romano sauce beautifully. The sauce from the chicken blends perfectly with the pasta, making each bite even more satisfying.
- Pro Tip: Try adding a light drizzle of olive oil or a sprinkle of fresh basil to your pasta for an extra burst of flavor.
2. Pair with a Fresh Salad
To balance the richness of the Chicken Romano, serve it alongside a fresh green salad. A simple salad with mixed greens, tomatoes, cucumbers, and a tangy vinaigrette dressing can offer a refreshing contrast to the creamy, savory chicken.
- Pro Tip: For added crunch and flavor, top your salad with toasted pine nuts or parmesan shavings.
3. Complement with Roasted Vegetables
Roasted vegetables like zucchini, carrots, or broccoli are a great choice to serve alongside this dish. The charred, caramelized flavors of the veggies balance out the creaminess of the chicken, adding a nutritious and flavorful touch.
- Pro Tip: Season your veggies with garlic, lemon zest, and fresh herbs like thyme or rosemary for extra flavor.
4. Add a Side of Garlic Bread
What’s a delicious Italian-inspired meal without garlic bread? A warm, crispy slice of garlic bread complements the Chicken Romano perfectly. The bread helps soak up any leftover sauce, making every bite a delightful experience.
- Pro Tip: For an extra indulgent twist, top your garlic bread with a sprinkle of mozzarella cheese before baking for a cheesy, golden finish.
5. Serve with Mashed Potatoes
For a heartier meal, mashed potatoes are a fantastic side to pair with Chicken Romano. The creamy potatoes blend wonderfully with the rich sauce, creating a comfort food dream. You can also opt for roasted mashed potatoes if you want a bit more texture and flavor.
- Pro Tip: Mix some sour cream or cream cheese into your mashed potatoes for an extra creamy texture.
6. Enjoy with a Light Soup
Start the meal off with a light soup like tomato basil or minestrone. These soups are both comforting and refreshing, providing a great balance to the richness of the main dish.
- Pro Tip: A warm bowl of garlic soup also works wonderfully with Chicken Romano, especially if you’re looking to add more depth to the flavors.
7. Complete with a Simple Dessert
To finish off the meal, why not treat yourself to a light dessert? Something like a lemon sorbet or a tiramisu will cleanse your palate and provide a sweet ending to your meal.
- Pro Tip: A small serving of chocolate mousse or a few fresh berries can also be a great way to round out the meal without feeling too heavy.
By pairing Chicken Romano with any of these sides, you’ll create a meal that’s both satisfying and well-rounded. Whether you go for something hearty like mashed potatoes or keep it fresh with a crisp salad, your Chicken Romano will be the star of the show. Remember, the key is balance—pairing the richness of the chicken with lighter, fresher options to make the meal complete and enjoyable!
Conclusion: Why You’ll Love Chicken Romano
And there you have it—a dish that’s simple to prepare, yet bursting with flavor. Chicken Romano is truly a culinary delight that brings together the crispy perfection of breaded chicken, the savory richness of Romano cheese, and a creamy sauce that will have you coming back for more. Whether you’re cooking for a special occasion or just want to enjoy a comforting homemade meal, this dish has all the qualities to make your taste buds dance.
Why Chicken Romano is a Must-Try:
- Deliciously Crispy Chicken: The perfectly seasoned crust provides that satisfying crunch with every bite.
- Rich and Flavorful Sauce: The creamy Romano cheese sauce enhances the chicken, taking the dish to another level of indulgence.
- Quick and Easy: Despite its gourmet flavors, Chicken Romano is surprisingly easy to prepare, making it perfect for both weeknight dinners and weekend feasts.
- Versatile Pairings: From pasta to vegetables, this dish pairs effortlessly with a variety of sides, making it adaptable for any meal.
This recipe will definitely be a favorite in your repertoire. Not only does it impress guests, but it also delivers that comforting homemade touch everyone loves. And the best part? It’s just as good for a weeknight dinner as it is for a special celebration.
So, grab your ingredients, get cooking, and experience the delicious magic of Chicken Romano. Trust me, your taste buds will thank you!
_______________________

Chicken Romano
Ingredients
For the Chicken:
- Boneless skinless chicken breasts (4 pieces)
- Chicken breast is the best choice for this dish as it cooks quickly and evenly, giving you a juicy, tender result. If you prefer a juicier cut, feel free to use chicken thighs instead!
- Salt and pepper to taste
- Always season your chicken well to ensure it’s full of flavor right from the start.
- Italian seasoning 1 tbsp
- A blend of oregano basil, and thyme will give the chicken that perfect Mediterranean touch.
For the Crispy Coating:
- Romano cheese grated (1/2 cup)
- This sharp nutty cheese adds a depth of flavor to the crispy crust that will make each bite irresistible.
- Parmesan cheese grated (1/2 cup)
- A classic Italian cheese Parmesan adds a salty, savory note to the coating.
- Panko bread crumbs 1 cup
- Panko bread crumbs are perfect for achieving that crunchy golden exterior. If you can’t find panko, regular bread crumbs will work too, but panko will give you the best texture.
- Garlic powder 1 tsp
- Garlic powder gives the chicken an extra layer of flavor in the crust. You could also use fresh minced garlic if you prefer.
For the Creamy Romano Sauce:
- Olive oil 2 tbsp
- Olive oil is ideal for sautéing the garlic and creating a rich base for the sauce.
- Minced garlic 3 cloves
- Fresh garlic adds a bold aromatic kick to the sauce.
- Heavy cream 1 cup
- For a rich velvety sauce, heavy cream is the way to go. If you prefer a lighter version, you can substitute half-and-half or whole milk.
- Romano cheese grated (1/2 cup)
- We’re doubling down on the Romano cheese in the sauce to ensure it’s wonderfully creamy and cheesy.
- Lemon juice 1 tbsp
- A squeeze of fresh lemon juice adds brightness and balances the richness of the sauce.
- Fresh parsley for garnish
- Fresh parsley not only adds a pop of color but also a refreshing herbaceous note that ties everything together.
Optional Garnishes and Sides:
- Lemon wedges for serving
- Serve with a slice of lemon for an extra burst of citrus.
- Pasta garlic bread, or roasted vegetables
- These sides make the perfect accompaniment to this creamy crispy dish.
Instructions
Step 1: Prepare the Chicken
- Start by preparing your chicken breasts. If they’re thick, you can slice them in half horizontally to create thinner, more even pieces. This ensures the chicken cooks through without drying out and helps create a crispy crust.
- Tip: For extra juiciness, consider lightly pounding the chicken breasts to an even thickness. This helps them cook faster and ensures they stay tender.
- Season both sides of the chicken with a pinch of salt, pepper, and Italian seasoning. The seasoning will enhance the chicken’s natural flavors and provide a savory base for the breading.
Step 2: Make the Crispy Coating
- In a shallow bowl, combine Romano cheese, Parmesan cheese, panko bread crumbs, and garlic powder. This mixture creates the deliciously crispy coating for your chicken.
- Tip: For the crispiest coating, make sure to press the breading onto the chicken as you coat it. This helps it stick better and gives you that perfect crunch.
- Dip each piece of chicken into the breadcrumb mixture, making sure it’s evenly coated on both sides. This is where the cheese really shines, creating a golden, crispy exterior with a rich, cheesy flavor.
Step 3: Fry the Chicken
- Warm a lot of olive oil in a big skillet on medium-high heat. The oil should cover the bottom of the pan but not completely submerge the chicken. You want enough oil to get a crisp texture without deep frying.
- Tip: Don’t overcrowd the pan! Fry the chicken in batches if necessary. Overcrowding can lower the temperature of the oil, which results in soggy breading.
- Carefully add the coated chicken to the hot pan and cook for about 4-5 minutes per side, until the chicken is golden brown and crispy. The internal temperature should be 165°F (74°C) when cooked thoroughly.
- Pro Tip: If you’re unsure whether the chicken is done, use a meat thermometer. It’s the most accurate way to ensure the chicken is cooked through while staying juicy inside.
Step 4: Make the Creamy Romano Sauce
- When the chicken is done, take it out of the skillet and place it on a plate. In the same skillet, reduce the heat to medium and add a bit more olive oil or butter.
- Add minced garlic and sauté it for 30 seconds, just until it becomes fragrant—be careful not to burn it!
- Finally, add the heavy cream and blend with the garlic. Allow the cream to simmer for about 2-3 minutes to thicken slightly. As it thickens, add in the Romano cheese and stir until it melts into a creamy, cheesy sauce.
- Tip: Stir constantly to prevent the sauce from curdling, and adjust the heat as needed. You want the sauce to be smooth and creamy, not too thick or too runny.
- Finally, squeeze in a bit of lemon juice to brighten the sauce and balance out the richness. Taste the sauce and adjust seasoning with salt, pepper, or more Italian seasoning, if needed.
Step 5: Combine the Chicken with the Sauce
- Return the crispy chicken to the skillet, spooning some of the creamy sauce over the top. Allow the chicken to simmer in the sauce for 2-3 minutes for the flavors to combine.
- Tip: This step is key for making sure the chicken absorbs some of the delicious sauce while keeping its crispy exterior. Don’t let it sit too long in the sauce to avoid losing that crispy texture!
Step 6: Garnish and Serve
- Sprinkle the finished dish with fresh parsley for a pop of color and flavor. Serve your Chicken Romano with your favorite sides like pasta, garlic bread, or roasted vegetables.
- Pro Tip: For a complete meal, try serving this with a simple green salad or some roasted potatoes. The creamy sauce pairs perfectly with any side!
- Now you have a perfectly crispy, creamy, and flavorful Chicken Romano that’s sure to wow your family or guests. With just a few simple steps, you can create a dish that tastes like it’s from a restaurant—but with the comfort of homemade goodness. Ready to dig in? Enjoy!
Notes
- Calories: 400
- Fat: 22g
- Saturated Fat: 6g
- Cholesterol: 100mg
- Sodium: 700mg
- Carbohydrates: 15g
- Fiber: 2g
- Sugar: 3g
- Protein: 40g
FAQs About Chicken Romano
Before you dive into making Chicken Romano, you might have a few questions. Don’t worry—we’ve got you covered! Here are some of the most commonly asked questions to help guide you through this delicious recipe and ensure it turns out perfectly every time.
1. Can chicken breasts be used in place of chicken thighs?
Yes, absolutely! While chicken thighs are used in the recipe for their juicy, tender texture, you can substitute with chicken breasts if you prefer. Just make sure to adjust the cooking time, as chicken breasts tend to cook faster than thighs. For the best results, choose boneless, skinless chicken breasts for even cooking.
2. Can I make Chicken Romano ahead of time?
Yes, you can! Chicken Romano is great for meal prep or making in advance. You can prepare and cook the chicken ahead of time, then store it in the fridge for up to 3 days. When ready to serve, simply reheat it in the oven to maintain its crispy texture, and drizzle the sauce over the top just before serving.
3. Can you make the sauce in advance?
Absolutely! The cheese sauce can be made ahead of time and stored in the refrigerator for up to 2 days. Just be sure to reheat it gently on the stove before serving. If the sauce thickens too much, you can thin it out with a splash of milk or chicken broth to get the desired consistency.
4. How can I make this dish gluten-free?
To make Chicken Romano gluten-free, simply swap out the all-purpose flour and breadcrumbs with gluten-free alternatives. Use gluten-free breadcrumbs and a gluten-free flour blend for the breading. Additionally, make sure the cheese you use is free from any hidden gluten additives.
5. Can I make Chicken Romano without cheese?
While cheese is the star ingredient in Chicken Romano, you can still make a tasty alternative without it. To keep the flavor profile intact, use a non-dairy cheese substitute or simply omit the cheese entirely. You can enhance the flavor by adding extra herbs like basil or oregano to the sauce, or even a dash of lemon zest for a zesty twist.
6. What sides pair well with Chicken Romano?
Chicken Romano is incredibly versatile and pairs beautifully with a variety of sides. For a lighter meal, serve it with a fresh green salad or some roasted vegetables. If you’re craving something heartier, consider pairing it with pasta, mashed potatoes, or a slice of garlic bread. Each option complements the rich, creamy chicken in a different way.
7. Can I freeze Chicken Romano?
Yes, you can freeze Chicken Romano, but it’s best to freeze the chicken and sauce separately to preserve their textures. Once cooked and cooled, wrap the chicken in plastic wrap and place it in a freezer-safe bag. The sauce can be stored in an airtight container. When you’re ready to enjoy, thaw everything in the refrigerator overnight and reheat on the stove or in the oven.
8. How can I tell if the chicken is cooked completely?
The best way to ensure your Chicken Romano is fully cooked is by checking the internal temperature. Use a meat thermometer to make sure the chicken reaches 165°F (75°C) at the thickest part. If you don’t have a thermometer, the chicken should be golden and crispy on the outside and no longer pink inside.
By answering these common questions, we hope to clear up any uncertainties and help you feel confident as you prepare your Chicken Romano. It’s a dish that’s simple, customizable, and guaranteed to impress. Whether you’re a first-timer or a seasoned pro, you’ll be able to enjoy this flavorful meal with ease! Happy cooking!