
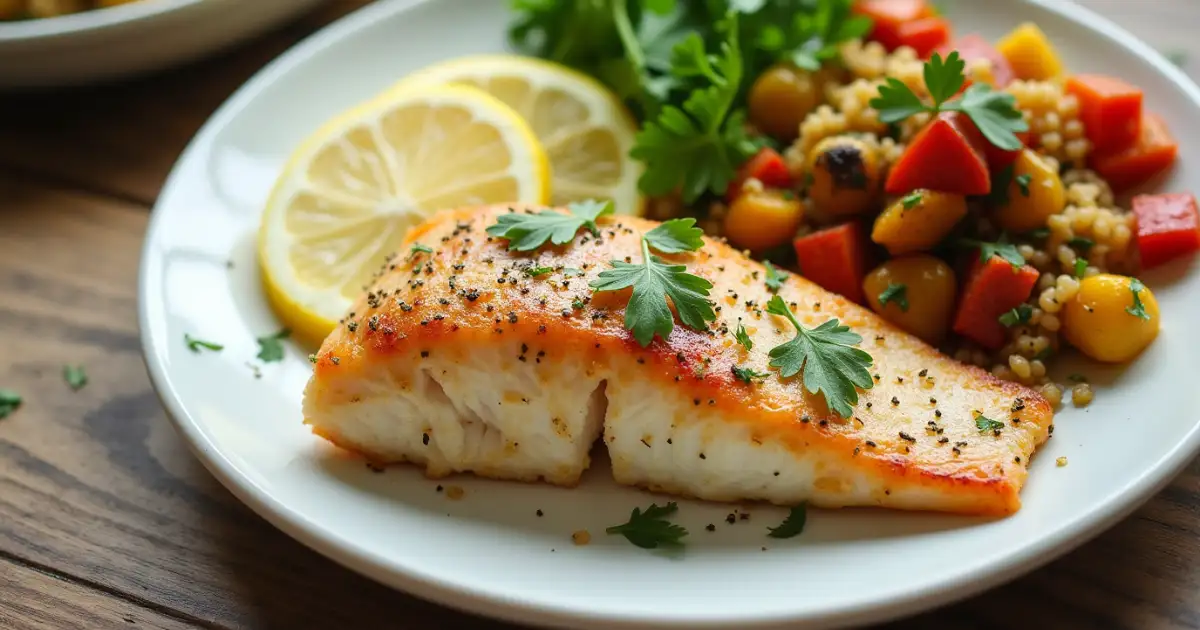
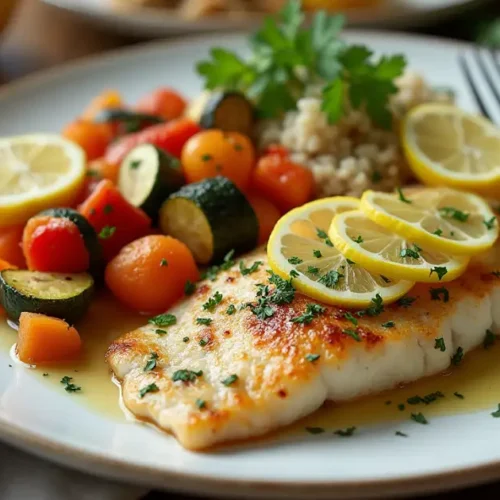
Have you ever craved a healthy fish recipe that’s both quick to make and incredibly satisfying? This baked tilapia might just become your new weeknight favorite. With its light, flaky texture and zesty lemon-garlic flavor, it’s the kind of dish that feels fancy—but takes almost no effort at all.
Whether you’re looking for a low-carb seafood recipe or simply want something the whole family will love, this one checks all the boxes. I love how it goes from oven to table in under 30 minutes, making it perfect for those busy nights when time—and patience—is short.
So if you’re ready for a simple seafood dinner that delivers big flavor without the fuss, let’s dive in!
Table of Contents
1. Key Benefits
Cooking baked tilapia at home isn’t just easy—it’s a total game-changer for your dinner routine. If you’re looking for a go-to healthy fish recipe that’s light, flavorful, and takes minimal effort, this one’s for you. Here’s why this dish is deserving of a spot in your weekly lineup:
Effortless and Quick
You can have this easy seafood dinner prepped and on the table in under 30 minutes. Perfect for busy weeknights when time is short but you still want something satisfying and nourishing.
Naturally Healthy
Tilapia is a low-calorie, lean protein that’s rich in nutrients like vitamin B12, potassium, and omega-3 fatty acids. When baked instead of fried, it becomes a guilt-free favorite that aligns with just about any eating plan, including low-carb and gluten-free diets.
Bursting with Flavor
With just a handful of pantry staples—think lemon juice, garlic, and a drizzle of olive oil—you can transform mild tilapia into something totally crave-worthy. It’s the kind of flavor that feels comforting yet fresh.
Family-Approved
Thanks to its gentle taste and flaky texture, even picky eaters usually give this dish a thumbs-up. And, you can just season it to your family’s liking.
Minimal Mess
Since everything bakes on one sheet (or even in foil packets), cleanup is a breeze. That’s fewer dishes to do and more time to enjoy your meal.
2. Ingredients
Let’s talk about what you’ll need to make this baked tilapia deliciously simple. The beauty of this recipe is that it uses basic, wholesome ingredients that you likely already have on hand. Each one plays a role in building bold, clean flavor without overwhelming the delicate fish.
What You’ll Need:
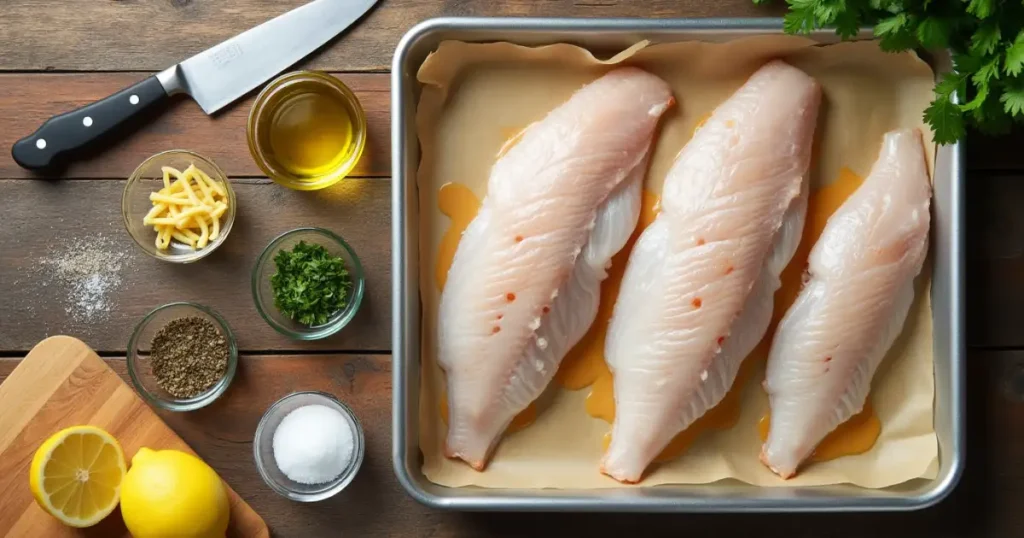
- 4 tilapia fillets (fresh or thawed if frozen)
Choose fillets that are evenly sized for even baking. Frozen works great too—just be sure to thaw completely and pat dry. - 2 tablespoons olive oil
Adds moisture and richness while helping the seasoning stick. - 2 cloves garlic, minced
Fresh garlic brings a warm, savory depth that really elevates the fish. - 2 tablespoons fresh lemon juice
Brightens the flavor and complements the mild tilapia beautifully. - 1 teaspoon paprika (optional)
Provides a hint of smokiness and a burst of color. - 1 teaspoon dried parsley or 1 tablespoon chopped fresh parsley
- For a fresh, herby finish. Feel free to swap with dill or thyme.
- Salt and freshly ground black pepper, to taste
Simple seasoning goes a long way when paired with lemon and garlic. - Lemon slices, for garnish
A little visual appeal and extra citrus zip never hurt!
Optional Add-ins:
Want to give it a twist? Try these:
- A pinch of red pepper flakes for gentle heat
- A light dusting of Parmesan cheese for a savory touch
- A handful of cherry tomatoes or zucchini slices baked alongside for a one-pan meal
This clean list keeps things approachable and pantry-friendly, while still giving you room to experiment. And if you’re wondering—yes, this is one of those recipes that proves simple can still be seriously flavorful. Let’s move on and see how easy it is to bring it all together!
3. How to Make Baked Tilapia
Making baked tilapia at home couldn’t be easier—and the best part is, it comes together in just a few simple steps. Whether you’re a beginner or a seasoned cook, this method is foolproof and delivers flaky, flavorful results every time.
Let’s walk through it together:
Step-by-Step Instructions
1. Preheat the oven
Begin by preheating your oven to 400°F (200°C). This temperature ensures the fish cooks evenly and stays moist inside while getting a gentle golden edge.
2. Prepare your baking dish
Line a baking sheet or shallow pan with parchment paper or foil for easy cleanup. If you’re aiming for more flavor, you can lightly grease the foil with a bit of olive oil.
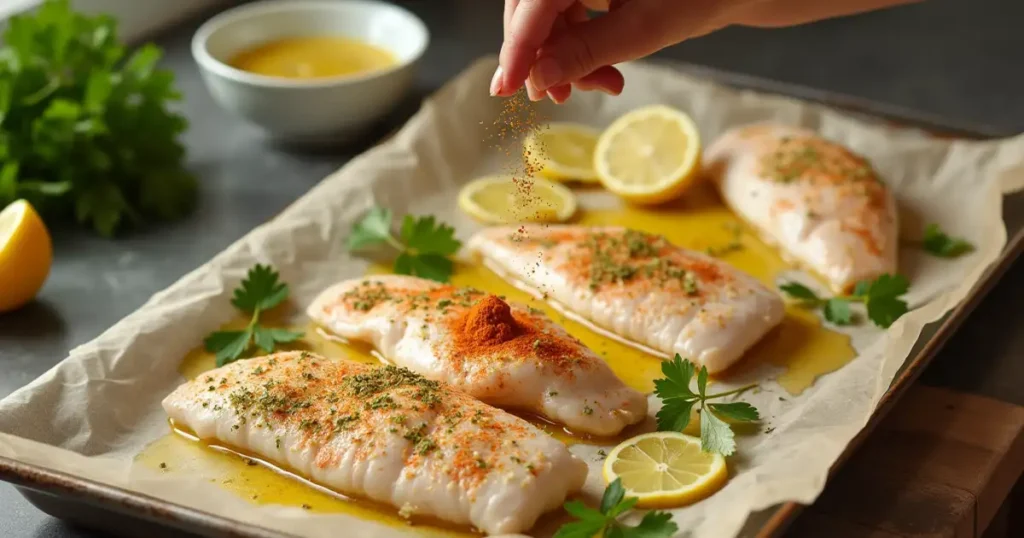
3. Dry and arrange the tilapia fillets
Pat the tilapia fillets dry with paper towels—this helps them bake up nicely instead of steaming. Place them in a single layer on your prepared sheet with spaces between pieces.
4. Mix and apply the seasoning
Combine the olive oil, lemon juice, garlic, paprika, and parsley in a little bowl. Spoon or brush sparingly over each fillet to coat each fillet well. Season with salt and black pepper to taste.
5. Bake to perfection
Put the tray into the oven and roast for 12–15 minutes or as thick as your fillets are. You’ll know they’re done when the fish is opaque, flakes easily with a fork, and has an internal temperature of 145°F (63°C).
6. Garnish and serve
Remove from the oven and garnish with fresh lemon slices or a little extra parsley for a pop of color and brightness.
A Few Extra Tips
- Don’t overbake! Tilapia cooks extremely quickly, and it dries out if overcooked. Start checking around the 12-minute mark.
- Cooking for one or two? Halve the recipe and bake it in a toaster oven.
- Want to add veggies? Toss some thinly sliced zucchini, cherry tomatoes, or bell peppers on the pan before baking for an easy one-pan meal.
With this simple, step-by-step process, you’ll have a tender, juicy oven-baked tilapia that tastes like it came from a restaurant—but without the fuss. Ready to explore some variations and upgrades? Let’s keep going!
4. Pro Tips and Variations
Once you’ve mastered the basics of baked tilapia, it’s time to make it your own. Whether you’re craving a bit more zing, want to switch up the flavors, or just need a few extra kitchen hacks, these tips and variations will take your dish to the next level.
Pro Tips for Perfect Baked Tilapia
- Pat the fish dry before baking
Moisture on the surface can cause steaming instead of baking. A quick blot with a paper towel helps the seasoning stick and improves texture. - Use parchment or foil for easy cleanup
No one wants a sticky mess. Lining your pan is easy to clean and keeps the fish from tearing. - Don’t skip the lemon
A squeeze of fresh lemon brightens everything and balances the richness of the olive oil. It’s a small step with immense payoff. - Add seasoning last-minute if using frozen fillets
Frozen fish tends to release water as it cooks. For better flavor, pat it dry halfway through and reapply a touch of the garlic-lemon mix. - Broil for a golden finish
Want a bit of crispness on top? Turn your oven to broil during the last 1–2 minutes. Just keep a close eye to avoid overcooking.
Easy Recipe Variations
Switch things up with these tasty tilapia twists:
- Spicy Cajun Baked Tilapia
Substitute Cajun seasoning and parsley for paprika for a smoky, robust taste. Great with rice or creamy coleslaw. - Garlic Parmesan Crusted Tilapia
Mix grated Parmesan with breadcrumbs and sprinkle on top before baking. Adds a crispy, cheesy finish that’s irresistible. - Mediterranean Style
Add sliced olives, cherry tomatoes, and a sprinkle of oregano. Serve with couscous or a Greek salad for a Mediterranean vibe. - Asian-Inspired Baked Tilapia
Swap olive oil for sesame oil, and use soy sauce, ginger, and a dash of rice vinegar. Garnish with chopped scallions and sesame seeds.
With these simple tweaks, your healthy tilapia recipe can transform into something new every time. It’s one of the reasons this dish stays on regular rotation in my kitchen — flexible, flavorful, and never boring. Let’s move on to how to serve it up like a pro!
5. Serving Suggestions
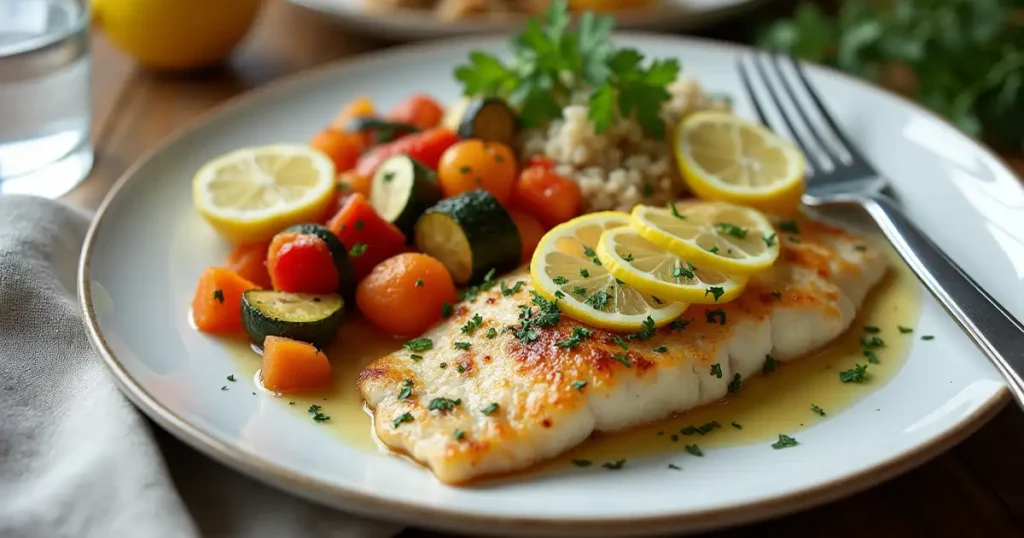
Once your baked tilapia is hot out of the oven and perfectly flaky, the next step is making it shine on the plate. The beauty of this dish is that it pairs well with so many sides, whether you’re going for fresh and vibrant, cozy and comforting, or something in between. Let’s explore some favorite ways to turn this simple fish into a well-rounded, satisfying meal.
Light and Healthy Pairings
If you’re keeping things on the lighter side, these options complement the mild flavors of tilapia without weighing you down:
- Steamed white rice or quinoa – Nutty, neutral grains which absorb the lemon-garlic juices so well.
- Roasted vegetables – Think asparagus, broccoli, or Brussels sprouts tossed with olive oil and sea salt.
- Garden salad with vinaigrette – Crisp lettuce, cucumber, cherry tomatoes, and a zesty lemon or balsamic dressing add freshness.
- Cauliflower mash – A low-carb alternative that still feels rich and creamy next to your flaky fish.
Comfort-Food Combos
Craving something heartier? These side dishes create a cozy, comforting meal without overpowering the star of the show:
- Garlic butter mashed potatoes – Classic and indulgent, especially with a spoonful of extra lemony pan juices over top.
- Buttered corn or sweet peas – Naturally sweet veggies that balance the citrusy flavors.
- Mac and cheese – A kid-friendly choice that turns this into a feel-good dinner everyone will love.
Bread and Sauces to Elevate
- Crusty baguette or dinner rolls – Perfect for soaking up any garlicky-lemon goodness left on the plate.
- Tartar sauce or herbed yogurt dip – For a creamy, tangy contrast.
- Mango salsa or pineapple pico – If you want to add a bright, tropical twist.
How to Plate It Like a Pro
Want to impress with presentation? Here’s a simple formula:
- Place a scoop of your chosen side (rice, mash, or salad) in the center of the plate.
- Lay the tilapia fillet gently over it.
- Drizzle with extra lemon juice or a spoonful of the baking pan juices.
- Top with a sprinkling of herbs and a piece of lemon for restaurant presentation.
With so many versatile sides and flavor boosters, oven-baked tilapia can fit any mood or mealtime. From fresh and fast to hearty and comforting, it’s the kind of dish you’ll want to return to again and again. Let’s end it with a brief summary and responses to your most frequently asked questions!
6. Conclusion
And there you have it—baked tilapia made easy, flavorful, and totally fuss-free. Whether you’re cooking for one or feeding a family, this go-to healthy fish recipe proves that weeknight dinners don’t need to be complicated to be delicious.
What makes this recipe such a winner? It’s quick to prepare, uses minimal ingredients, and delivers restaurant-level results in the comfort of your own kitchen. Plus, the versatility means you can dress it up or keep it simple, depending on what you’re in the mood for.
From the zesty lemon-garlic flavor to the tender, flaky texture, each bite brings a balance of freshness and comfort that satisfies every time. And cleanup? Practically effortless.
If you’re new to cooking seafood at home, this dish is a great starting point. And if you’re already a seasoned cook, it’s a reminder that sometimes the best meals are also the simplest.
Now that you’ve got the steps down and a few pro tips in your pocket, you’re all set to make this oven-baked tilapia your own.
Hungry for more seafood ideas? Stick around—there’s plenty more kitchen inspiration coming your way!
Fish takes center stage in this recipe, but if you prefer beef, feel free to experimental. Use other recipes of fish.
__________________
Baked Tilapia
Ingredients
What You’ll Need:
- 4 tilapia fillets fresh or thawed if frozen
- Choose fillets that are evenly sized for even baking. Frozen works great too—just be sure to thaw completely and pat dry.
- 2 tablespoons olive oil
- Adds moisture and richness while helping the seasoning stick.
- 2 cloves garlic minced
- Fresh garlic brings a warm savory depth that really elevates the fish.
- 2 tablespoons fresh lemon juice
- Brightens the flavor and complements the mild tilapia beautifully.
- 1 teaspoon paprika optional
- Provides a hint of smokiness and a burst of color.
- 1 teaspoon dried parsley or 1 tablespoon chopped fresh parsley
- For a fresh herby finish. Feel free to swap with dill or thyme.
- Salt and freshly ground black pepper to taste
- Simple seasoning goes a long way when paired with lemon and garlic.
- Lemon slices for garnish
- A little visual appeal and extra citrus zip never hurt!
Optional Add-ins:
- Want to give it a twist? Try these:
- A pinch of red pepper flakes for gentle heat
- A light dusting of Parmesan cheese for a savory touch
- A handful of cherry tomatoes or zucchini slices baked alongside for a one-pan meal
Instructions
Step-by-Step Instructions
Preheat the oven
- Begin by preheating your oven to 400°F (200°C). This temperature ensures the fish cooks evenly and stays moist inside while getting a gentle golden edge.
Prepare your baking dish
- Line a baking sheet or shallow pan with parchment paper or foil for easy cleanup. If you’re aiming for more flavor, you can lightly grease the foil with a bit of olive oil.
Dry and arrange the tilapia fillets
- Pat the tilapia fillets dry with paper towels—this helps them bake up nicely instead of steaming. Place them in a single layer on your prepared sheet with spaces between pieces.
Mix and apply the seasoning
- Combine the olive oil, lemon juice, garlic, paprika, and parsley in a little bowl. Spoon or brush sparingly over each fillet to coat each fillet well. Season with salt and black pepper to taste.
Bake to perfection
- Put the tray into the oven and roast for 12–15 minutes or as thick as your fillets are. You’ll know they’re done when the fish is opaque, flakes easily with a fork, and has an internal temperature of 145°F (63°C).
Garnish and serve
- Remove from the oven and garnish with fresh lemon slices or a little extra parsley for a pop of color and brightness.
A Few Extra Tips
- Don’t overbake! Tilapia cooks extremely quickly, and it dries out if overcooked. Start checking around the 12-minute mark.
- Cooking for one or two? Halve the recipe and bake it in a toaster oven.
- Want to add veggies? Toss some thinly sliced zucchini, cherry tomatoes, or bell peppers on the pan before baking for an easy one-pan meal.
- With this simple, step-by-step process, you’ll have a tender, juicy oven-baked tilapia that tastes like it came from a restaurant—but without the fuss. Ready to explore some variations and upgrades? Let’s keep going!
Notes
| Nutrient | Amount |
| Calories | 210 kcal |
| Protein | 23 g |
| Total Fat | 9 g |
| Saturated Fat | 1.5 g |
| Carbohydrates | 3 g |
| Fiber | 0.5 g |
| Sugar | 0 g |
| Cholesterol | 60 mg |
| Sodium | 130 mg |
7. FAQs
Curious about how to make your baked tilapia even better? You’re not alone! Below are answers to some of the most common questions that pop up when making this quick and healthy fish recipe at home.
1. Can I use frozen tilapia?
Absolutely! Frozen tilapia works just as well as fresh. Just make sure to thaw it completely in the fridge and pat it dry before baking. Removing excess moisture ensures better flavor and texture.
2. How do I know when tilapia is fully cooked?
Your tilapia is done when it:
– Turns completely opaque and white throughout
– Flakes easily with a fork
– Reaches an internal temperature of 145°F (63°C)
It typically takes 12–15 minutes at 400°F, depending on the thickness of the fillets.
3. Can I season it differently?
Definitely! Tilapia is a mild fish that pairs well with a variety of flavors. Try:
– Cajun seasoning for spice
– Lemon pepper for zesty brightness
– Italian herbs for a Mediterranean twist
Feel free to adjust the herbs and spices based on your taste preferences.
4. What’s the best way to store leftovers?
Cool leftovers completely and store them in an airtight container in the fridge for up to 2 days. Reheat gently in the oven or microwave to avoid drying out the fish.
Tip: Leftover tilapia is great flaked over a salad or tucked into tacos!
5. Is this recipe good for meal prep?
Yes! Baked tilapia is ideal for meal prepping. Bake several fillets at once and pair them with steamed veggies, rice, or salad for easy, ready-to-go lunches or dinners.
6. Can I bake it in foil packets?
You can! Foil packets help seal in moisture and make cleanup even easier. Just place the fish and seasonings in the center, fold the edges to seal, and bake as directed. It’s also a great option for grilling.
These quick answers are here to help you feel confident every step of the way. If you’ve got more questions, feel free to drop them in the comments—we’re all about making home cooking easier and more enjoyable!